So, another year, and another trip to Dayton Ohio for Hamvention.
ZL1RKO and I are doing a bit of a road trip and as well as Hamvention – see some of the US and hopefully get to see some AM towers and other broadcasting related sites around the country.
But when I pulled out the TinyTracker4,what do you know, the EEPROM is no longer accepting updates to the config, this being 2 and a bit weeks out from flying out…. OUCH.
I was looking forward to using APRS VoiceAlert while driving around and trying to meet some other Hams either on their way to Dayton – or just to socialise.
So in a very rushed thought process – decided to dust off the old Direwolf config, and see if I can modify it to do some more interesting things.
My current plan – as at 26 April 2024 – is to get Direwolf to hotspot to the mobile phone while driving – but with a twist.
As I have an iPhone push notifications *have* to go through the Apple Notifications service which is annoying – so I am going to try and get Direwolf to push a notification via Signal Messenger when either the RF or iGate detects someone within 10km of me – or push notification when someone has VoiceAlert but need to investigate that a bit more too.
The advantage of using this system, is I can also get GPSD to log my entire drive so I dont miss anything where iGates are not present.
My intention is update here as I get things working satisfactory – but with only 2 weeks to go, I might be unsuccessful – but hey – gotta give these things a go right..
Club Table Sale & Events Calendar
With more and more people frequenting the annual Table Sales around the North Island, I decided to attempt to keep a calendar up to date with the sale dates, locations, start times and other details of as many table sale and contest weekends as I can.
I am going to try and keep it as up to date as possible, but if I miss one please let me know, zl1clh@hodgetts.geek.nz, and I will include it in the future.
I am going to also try and add contest weekends and other information to this as well – my intention is to attempt to create a ‘Ham Radio Event Calendar’ you can share with your friends, club members or any interested party.
The calendar, which is on the right hand site of this blog looking out for the next 3 events, is available with the following links :
If you want to integrate into your iOS calendar, or other calendar software please use this this link :
ICAL Calendar Link
If you just want to view the calendar just on a webpage, please follow this link :
Web Page Calendar Link
Please note : I take no responsibility for the accuracy of the information contained within the calendar, HOWEVER every effort is made to keep the information accurate and as up to date as possible.
Cancellations or postponements of events, might not filter through to me, so may be missed, and events that always occur on the same weekend every year, is set as a recurring event, and is usually overlooked by me (think Jock White Field Day).
As always – please get in touch if you would like to help out maintaining the information within the calendar, or you find it useful, or have just stumbled across my blog..
73’s – ZL1CLH
S20 Smart Switch Perl Script
Hey, so this is here because I keep losing it on the Internet, and I keep building a new Raspberry Pi every now and then, and the poor fish’s lights don’t get turned on or off automatically anymore..
This code is here, from a git hub repository so I can find it easily again :
#!/usr/bin/perl -w
#
# Based on
#  http://forums.ninjablocks.com/index.php?
#   p=/discussion/2931/aldi-remote-controlled-power-points-5-july-2014/p1
#  and
#   http://pastebin.ca/2818088

use strict;
use IO::Socket;
use IO::Select;
use Data::Dumper;

my $port = 10000;

my $fbk_preamble = pack('C*', (0x68,0x64,0x00,0x1e,0x63,0x6c));
my $ctl_preamble = pack('C*', (0x68,0x64,0x00,0x17,0x64,0x63));
my $ctl_on       = pack('C*', (0x00,0x00,0x00,0x00,0x01));
my $ctl_off      = pack('C*', (0x00,0x00,0x00,0x00,0x00));
my $twenties     = pack('C*', (0x20,0x20,0x20,0x20,0x20,0x20));
my $onoff        = pack('C*', (0x68,0x64,0x00,0x17,0x73,0x66));
my $subscribed   = pack('C*', (0x68,0x64,0x00,0x18,0x63,0x6c));

sub findBauhn($)
{
    my ($mac) = @_;

    my $bauhn;
    my $reversed_mac = scalar(reverse($mac));
    my $subscribe    = $fbk_preamble.$mac.$twenties.$reversed_mac.$twenties;

    my $socket = IO::Socket::INET->new(Proto=>'udp', LocalPort=>$port, Broadcast=>1) ||
                     die "Could not create listen socket: $!\n";
    $socket->autoflush();
    my $select = IO::Select->new($socket) ||
                     die "Could not create Select: $!\n";

    my $to_addr = sockaddr_in($port, INADDR_BROADCAST);
    $socket->send($subscribe, 0, $to_addr) ||
        die "Send error: $!\n";

    my $n = 0;
    while($n < 3) {
        my @ready = $select->can_read(0.5);
        foreach my $fh (@ready) {
            my $packet;
            my $from = $socket->recv($packet,1024) || die "recv: $!";
            if ((substr($packet,0,6) eq $subscribed) && (substr($packet,6,6) eq $mac)) {
                my ($port, $iaddr) = sockaddr_in($from);
                $bauhn->{mac}      = $mac;
                $bauhn->{saddr}    = $from;
                $bauhn->{socket}   = $socket;
                $bauhn->{on}       = (substr($packet,-1,1) eq chr(1));
                return $bauhn;
            }
        }
        $n++;
    }
    close($socket);
    return undef;
}

sub controlBauhn($$)
{
    my ($bauhn,$action) = @_;


   my $mac = $bauhn->{mac};

    if ($action eq "on") {
        $action   = $ctl_preamble.$mac.$twenties.$ctl_on;
    }
    if ($action eq "off") {
        $action   = $ctl_preamble.$mac.$twenties.$ctl_off;
    }

    my $select = IO::Select->new($bauhn->{socket}) ||
                     die "Could not create Select: $!\n";

    my $n = 0;
    while($n < 2) {
        $bauhn->{socket}->send($action, 0, $bauhn->{saddr}) ||
            die "Send error: $!\n";

        my @ready = $select->can_read(0.5);
        foreach my $fh (@ready) {
            my $packet;
            my $from = $bauhn->{socket}->recv($packet,1024) ||
                           die "recv: $!";
            my @data = unpack("C*", $packet);
            my @packet_mac = @data[6..11];
            if (($onoff eq substr($packet,0,6)) && ($mac eq substr($packet,6,6))) {
                return 1;
            }
        }
        $n++;
    }
    return 0;
}

($#ARGV == 1) || die "Usage: $0 XX:XX:XX:XX:XX:XX <on|off|status>\n";

my @mac = split(':', $ARGV[0]);
($#mac == 5) || die "Usage: $0 XX:XX:XX:XX:XX:XX <on|off|status>\n";

@mac = map { hex("0x".$_) } split(':', $ARGV[0]);
my $mac = pack('C*', @mac);


my $bauhn = findBauhn($mac);
defined($bauhn) || die "Could not find Bauhn with mac of $ARGV[0]\n";
if ($ARGV[1] eq "status") {
    print $bauhn->{on} ? "on\n" : "off\n";
    exit(0);
}
($ARGV[1] ne "on" && $ARGV[1] ne "off") && die "Usage: $0 XX:XX:XX:XX:XX:XX <on|off|status>\n";

for(my $n=0; $n<3; $n++) {
    controlBauhn($bauhn, $ARGV[1]) && exit(0);
}
die "Could not change Bauhn to $ARGV[1]\n";Time-Difference-of-Arrival using RPi and RTL-SDR
Work has been having some issues with wireless microphones getting interfered with, so thought we would investigate something like this.
This uses Raspberry Pi’s and RTL-SDR’s to cheaply locate rogue transmitters.
Wanting to see how well it works – and if it could help with the issues, I was think about putting it around the stadium and seeing if we can locate the source of some of the interference.
Please check out the following video :
You can download a copy of the ArchLinux ISO from the following location
http://www.panoradio-sdr.de/wp-content/uploads/2019/04/pi_image_tdoa_v2.zip
I am just going to document my setup here for future use or deployment.
Write image to SD card in the usual way, and power up the Pi.
This image has an unknown root password, and I need to get Wifi working, so take out the SD card after booting and edit the following.
This install of Arch Linux does not have wpa_supplicant running, so it’s not as easy it as it on Raspbian – and given the custom build of this I want to ensure I am not changing to much of either kernel modules or the user space environment.
So to change the root password, which is unknown on this build, you will need to perform this to get into ‘single user mode’.
Mount SD card in another computer
Edit the file : 'cmdline.txt'
Add the following after the text rootwait init=/bin/bash
save the file, exit
Reinsert SD card into pi, and power up.
Once the PI has booted, you should see a prompt:
sh-5.0#
This indicates that you are in single user mode, and you should now be able to do the following.
At the command prompt type:
passwd <enter>
New password: <enter the new root password>
Retype new password: <enter the same password as above>
Once you are back at the sh-5.0# prompt you can power down the Pi, and you will need to reverse what you did, so it no longer boots in Single User Mode.
mount the SD card into another computer and edit the cmdline.txt file and remove the init=/bin/sh after the rootwaitSave the file, and unmount the SD card, and put it back into the Pi and power up again.
This will create your new Root password as what you entered before.
Once you are at the alarmpi login: prompt you should be able to login now as
root
<your root password>
Once you have logged in as root, type
wifi-menuThis will take you into the Wifi-Menu where you will be able to connect it to your wifi if you chose.
Select your WiFi name in the menu, and enter the password.
This should connect you to the wifi network and give you an IP address.
Confirm this by pinging something inside your network, or even if you can outside your network (8.8.8.8) for example.
ping 8.8.8.8Once you have successfully confirmed you can ping 8.8.8.8 or something inside your network, you will need to make the wifi adaptor come up on boot.
For this you will need to run the following command
systemctl enable netctl-auto@wlan0.serviceThe Pi is now ready to go.
For safety and double checking, reboot the pi and make sure it boots correctly and comes back up to the login prompt.
Log back in as root, and confirm you can ping internal and external services again.
Once you have confirmed that, log out – either exit, or pressing CTL+D and login with the following username and password
username: alarm
password: alarm
Actually we should start with changing the password of the alarm user – at the command prompt please type
passwdand change the password to something you will remember, but hard to guess.
Because this image has an authorized_keys entry for the user ‘alarm’ and I don’t trust that at all, please edit the file (with any editor of your choice) and remove the user : stefan@ubuntu – with this in there, he *could* login without a password
cd .ssh
vi authorized_keys
<double press d> and the line should be removed
type : then wq and then press enter.
It should drop you back to the shell prompt.
From here we will create some new SSH keys for this user – to allow the server to connect to it, to start the scripts and to copy the recorded files for processing.
These SSH keys will enable the server to login without the need for a password, once you have created these, you really need to be very careful who you give them to.
Let’s create the ssh keys:
ssh-keygen -o -a 100 -t ed25519You can press enter for the name of the file, and please do not use ‘passphrases’ you can just press enter for them twice.
Once the key is made, you should have two new files.
id_ed25519 and id_ed25519.pub
However, once you have created the key pairs, you will need to share the .pub file with your server administrator , and they will need to share their .pub with you for the user that is created on the server for this task.
You will need to put each opposite pair’s .pub contents into the ~.ssh/authorized_keys file.
Once the server has the clients’ .pub entered in, and the client has the server’s .pub contents in the authorized_keys file, seamless interaction should now be able to take place.
However, in the first instance, it would be beneficial to ‘ssh’ to the remote party first, so as to approve the ‘host identity’ interactive prompt that happens when you connect to a machine for the first time.
To attempt to make this as deployable as possible, and not have to run with pinholes through routers and firewalls, I am going to make the pi create a reverse SSH tunnel.
That is, get the pi to connect to the master server via SSH and allow a port to come back through that created tunnel to be able to log into the server without the need of any port forwards or vpn’s.
Not ideal, I would prefer a VPN service, but this is a bit more robust.
Log out of ‘alarm’ and log back into root.
Create a script called the following name:
vi /usr/local/bin/ssh.shIn that file enter the following details
#!/bin/bash
/usr/bin/ssh \
  -o ServerAliveInterval=20 \
  -o ServerAliveCountMax=3 \
  -o ExitOnForwardFailure=yes \
  -o StrictHostKeyChecking=no \
  -i /home/alarm/.ssh/id_ed25519 \
  -N -T -R####:localhost:22 rftracker@PUT-YOUR-TUNNEL-SERVER-HOST-HERE
Please see your server administrator on what port number #### to use, this will enable the server to reverse tunnel once this is running – which we will do on boot, but each of these ports need to be unique to the install.
Once that file is created please make it executable by
chmod a+x /usr/local/bin/ssh.shNow we need to make is start on system boot.
Enter the following
vi /etc/systemd/system/sshtunnel.service

[Unit]
Description=MyScript

[Service]
ExecStart=/usr/local/bin/ssh.sh

[Install]
WantedBy=multi-user.target
Now we will create a ‘timer’ script to wait 1 minute after power on, and make sure that wlan0 is running before it will start the tunnel..
This is to ensure that all parts of the system are running.
So create the timer service like so
vi /etc/systemd/system/sshtunnel.timer

[Unit]
Description=Runs myscript one minute after boot

[Timer]
# Time to wait after booting before activation
OnBootSec=1min
Unit=sshtunnel.service

[Install]
WantedBy=multi-user.target
Set permissions and executable bits on the two services
chmod 755 /etc/systemd/system/ssh*Then we need to enable the sshtimer service to run
systemctl enable sshtunnel.timer
systemctl start sshtunnel.timer
Reboot the Pi.
Once you log in as alarm with your new password, you should have the reverse SSH tunnel running and should see something like
ps aux |grep ssh

/usr/bin/ssh -o ServerAliveInterval=20 -o ServerAliveCountMax=3 -o ExitOnForwardFailure=yes -o StrictHostKeyChecking=no -i /home/alarm/.ssh/id_ed25519 -N -T -R2021:localhost:22 rftracker@10.30.0.1
If that line is in your process list, then you have a successful SSH tunnel to the server, and the server now can log into , copy and start scripts from this connected host.
I am pretty sure that is all that is needed for now.
More updates and the final test results should be published once we have it up and running and tested.
Just one thing to note, for future ZL1CLH when he comes to try and work out what he did to get this going…
You will need to use 127.0.0.1 as the ‘localhost’ address when connecting to the ‘remote’ Pi’s if you use localhost, you will actually be connecting to the IPv6 address of the SSH server running on the server, and not actually make it over to the pi.
but 127.0.0.1 will use the port re-direction as specified in the reverse tunnel setup earlier.
A little drive around LA
So after all the testing, and building of the Direwolf Raspberry Pi Tracker, I took it to the US.
It performed really well in California.
I tethered to my mobile phone and discovered that I needed to sit in the personal hot spot screen for the device to actually connect every time.
Not sure why, but from the second picture, I do wonder if it was the cause of the loss of packets in Texas.
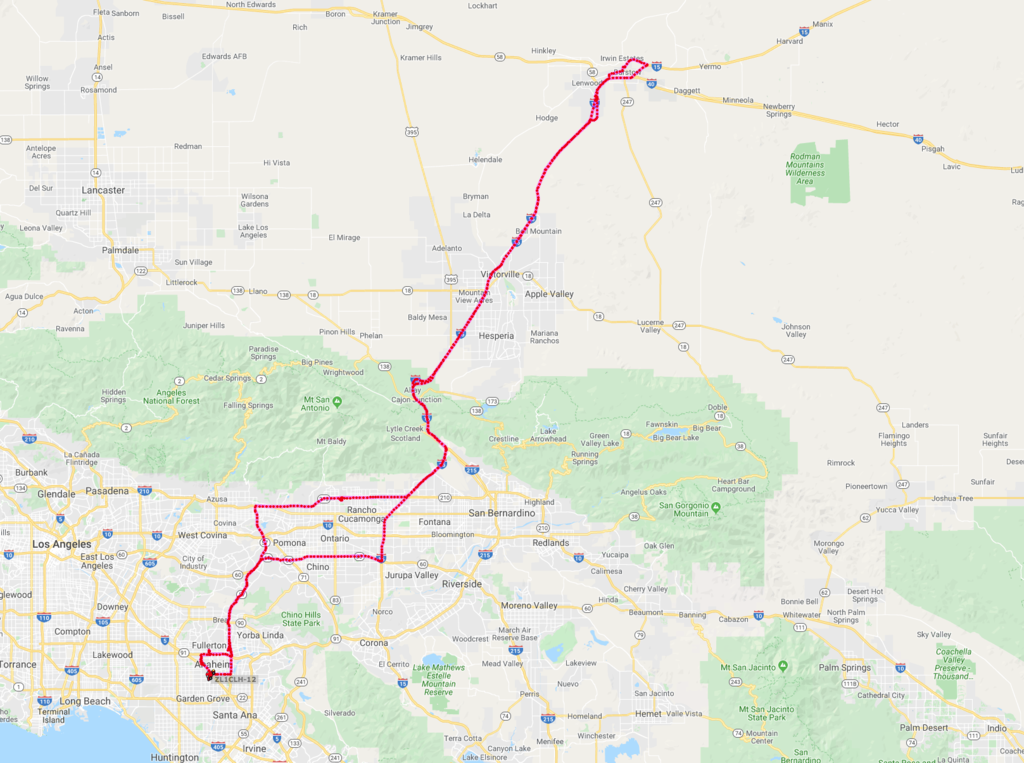
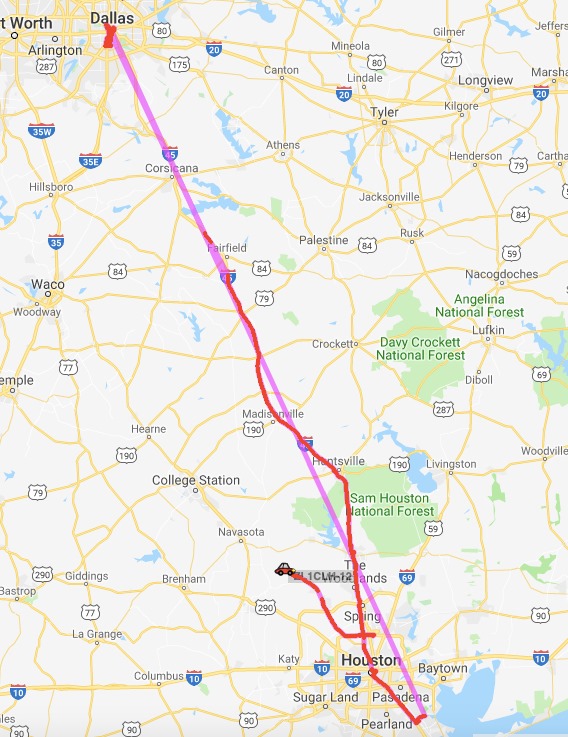
In there, but did not capture it as I don’t think it worked correctly was the drive down Elm Street – where Kennedy was assassinated.
TCP/IP Only Direwolf Tracker
So I am about to head to the USA for a few weeks for a holiday.
I am quite keen to track my driving around Texas and LA but I am not that keen to take a large radio with me to do APRS tracking…
I have done this before and quite frankly it was just too annoying to take Radio, Tiny Track 4, Antenna, Mag Base, Cables and all the other stuff that is required to make it work.
So I decided to build a raspberry Pi with a GSM modem and GPS module in an effort to cut down on the required hardware to take for this.
So Raspberry Pi 3+ , Sierra Wireless 4G GSM Modem, GPS Module is the hardware that I needed to take with me..
I intend to 3D print a case for it all so it’s nicely presented, but that might done in the next few weeks.
But on to the setup:
WVDIAL
I setup wvdial to establish the 4G connection on the GSM network .
[Dialer Defaults]
Init1 = ATZ
Init2 = ATQ0 V1 E1 S0=0
Init3 = AT+CGDCONT=1,"IP","internet"


Init2 = ATQ0 V1 E1 S0=0 &C1 &D2 +FCLASS=0
Modem Type = Analog Modem
Phone = *99#
ISDN = 0
Password = { }
New PPPD = yes
Username = { }
Modem = /dev/ttyUSB3
Baud = 9600
I needed to make wvdial start on boot – so its really headless so had to set the following up.
On raspbian create a file /etc/network/interfaces.d/pppd
And copy the following code into that file.. this will enable the ppp0 interface on boot, and dial your internet connection, once its established OpenVPN will connect and allow you to connect to the unit with a known IP address.
auto ppp0
iface ppp0 inet wvdial
I also added ufw firewall and only allowed port 22 for SSH to be able to connect to the Raspberry Pi – this is fairly self explanatory so will not document it here, and only because its running on a public IP address, its best to keep it locked down as much as you can.
GPS Module
Because the Sierra Wireless modem take 3 tty devices, sometime the GPS module would not be /dev/ttyUSB0 at times, and not cause tracking properly.
I had to create a symlink so I always had a consistent device so chose the logical /dev/gps
I created the file : /etc/udev/rules.d/99-usbserial.rules and included details from the following.
udevadm info --query=property --name=/dev/ttyUSB0 | grep SERIALThis will give you results similar to the following – this is full output without the grep as suggested in the previous line.
Because my GPS unit has no serial number, or a short code, I had to use the full name of the device, which I found from the following.
DEVPATH=/devices/platform/soc/3f980000.usb/usb1/1-1/1-1.2/1-1.2:1.0/ttyUSB0/tty/ttyUSB0
DEVNAME=/dev/ttyUSB0
MAJOR=188
MINOR=0
SUBSYSTEM=tty
USEC_INITIALIZED=19091176
ID_VENDOR=Prolific_Technology_Inc.
ID_VENDOR_ENC=Prolific\x20Technology\x20Inc.\x20
ID_VENDOR_ID=067b
ID_MODEL=USB-Serial_Controller_D
ID_MODEL_ENC=USB-Serial\x20Controller\x20D
ID_MODEL_ID=2303
ID_REVISION=0400
ID_SERIAL=Prolific_Technology_Inc._USB-Serial_Controller_D
ID_TYPE=generic
ID_BUS=usb
ID_USB_INTERFACES=:ff0000:
ID_USB_INTERFACE_NUM=00
ID_USB_DRIVER=pl2303
ID_VENDOR_FROM_DATABASE=Prolific Technology, Inc.
ID_MODEL_FROM_DATABASE=PL2303 Serial Port
ID_PATH=platform-3f980000.usb-usb-0:1.2:1.0
ID_PATH_TAG=platform-3f980000_usb-usb-0_1_2_1_0
DEVLINKS=/dev/gps /dev/serial/by-id/usb-Prolific_Technology_Inc._USB-Serial_Controller_D-if00-port0 /dev/serial/by-path/platform-3f980000.usb-usb-0:1.2:1.0-port0
TAGS=:systemd:
But as I mentioned, I had no ID_SERIAL_SHORT or anything unique for my device so had to use ID_SERIAL full name – put the following with your settings into your file /etc/udev/rules.d/99-usbserial.rules
ACTION=="add",ENV{ID_BUS}=="usb",ENV{ID_SERIAL}=="Prolific_Technology_Inc._USB-Serial_Controller_D",SYMLINK+="gps"Once that was set, every reboot makes the GPS module appear as /dev/gps which is good for Direwolf.
Direwolf Tracker
So I built a minimal Direwolf config as previously documented here, and many places, for gpsd support and enabled Smart Beaconing and GPS with a Custom Beacon advising of my Mobile number and the fact I was on Holiday in the US.
ADEVICE - default
ACHANNELS 1
CHANNEL 0
MYCALL *** Your Call Sign ***
MODEM 1200
GPSNMEA /dev/gps
TBEACON SENDTO="IG" COMPRESS=1 VIA=WIDE1-1,WIDE2-1 SYMBOL=car
SMARTBEACONING 48 0:45 5  0:90 0:05 15 25
CBEACON SENDTO="IG" COMPRESS=1 info="> Some Text telling you what I am up to"
IGSERVER noam.aprs2.net
IGLOGIN *** Your Call Sign *** *** APRS Password ***
As you can see it is a fairly basic config, no digipeating and only a TBeacon for Tracker and a CBeacon for custom note sent every 30 minutes.
Because Direwolf expects to find a Sound card, and the raspberry Pi does not have an input one, and I don’t need one anyway, I had to run Direwolf with some funny shell code to make it start on boot, with no standard in existing when no user is logged in.
This is the code I found to run some software with standard in with temporary nothingness.
#!/bin/bash
fifo=$(mktemp -u) &&
  mkfifo "$fifo" &&
  (rm "$fifo" && direwolf -c /etc/direwolf/direwolf.conf -  <&3 3<&- &) 3<> "$fifo"
I can’t think of much more to put here for this config.
Just modify your smartbeaconing settings, I am still playing with it over the next while before holiday, so I would not recommend using them, but they work, just not sure if they are ‘the best’.
Once I have printed the 3D case, I will take some photos but am looking forward to only having to take the Pi with me as my intention it to build a case with the printout for the GPS puck to sit in – so will only need to take a power cable to power the pi and have no excess wires hanging around.
NZART Branch 28 Equipment Sale 2019 Post Drive Debrief
Well, it was a bit of an interesting experience, and experiment to be honest. 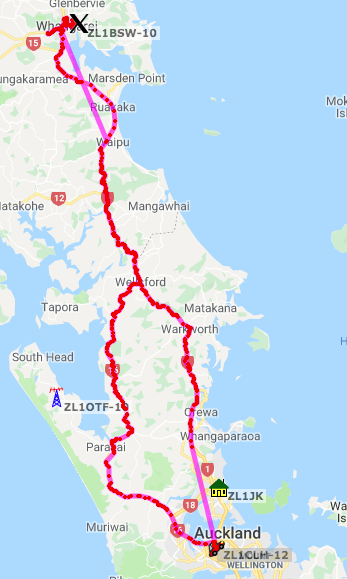
Here is a track of my drive, as you can see, I had two little oddities with leaving home till just before Whangaparaoa and heading home till just before Waipu.
Not sure what’s going on there but restarting Direwolf seemed to have corrected it for both issues – so it might have been an issue with it swapping Wireless networks or something else, but there was nothing to indicate an error – perhaps the iGate servers do not like a change of IP address without a disconnection – but I am sure I can work it out over time.
I did not Digipeat any traffic on the drive north, and just to put that into perspective,
the last packet on the drive north to be pick up by an RF station was:
2019-07-27 07:55:56 NZST: ZL1CLH-12>APDW15,WIDE1-1,WIDE2-1,qAR,ZL1AOX:!/`uGSzZun>+TG/A=000549
And the first packet to be re-aquired by an RF station on the drive north was:
2019-07-27 09:02:01 NZST: ZL1CLH-12>APDW15,WIDE1-1,WIDE2-1,qAR,ZL1BSW-10:!/`c,xzU_u>&RG/A=000982
Total time of 01:06:05 when I was in TCP/IP land only – and in that time no other stations were heard.
But as you can see from the following, there were not too many APRS users attending the sale – but the sale was well represented – and some very good equipment was brought by everyone.
The Cars with APRS at the sale: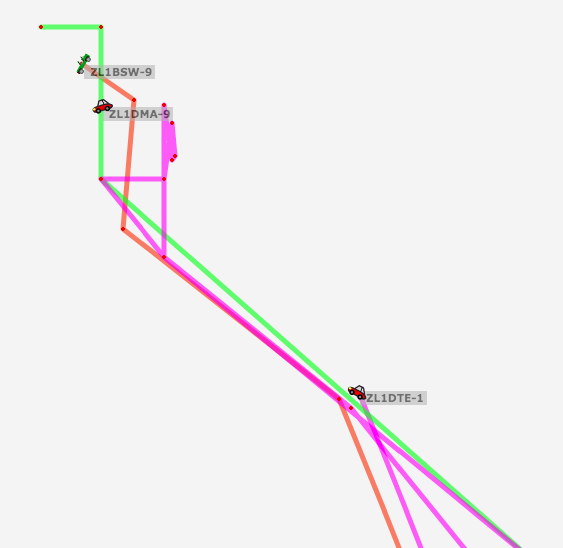
The tracks they made to attend the sale: 
The pink line was mine in both directions, with me going wild through the water on my return leg home.
Worthwhile I have to say – but also a little disappointing.
In a few weeks there is a sale on in Hamilton (South of Auckland) so might try this again then, and see if I get better performance on the south bouth destination.
But I had so much fun attending this sale (my first one in this region) and will attend again next year.
The day of the Sale, Drive and portable iGate
Let us just keep a record of the map as it is at 06:30am NZTime. 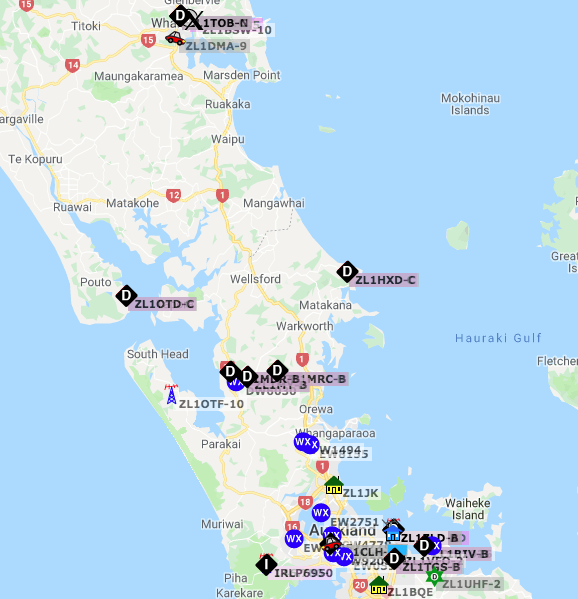
I will be driving from the little red car at the bottom of the screen grab, oddly to the red car ZL1DMA-9 in Whangarei – but between Wellsford and Marsden Point there is not a lot of digipeaters, so that is why I decided to do this little experiment.
From the rag chewing I heard on the local 2meter repeaters, there are quite a few people heading north today – so fingers crossed this little experiment will be successful – and I will consider any packet that is not mine captured via RF and iGated and Digipeaters between those areas as a success.
See you in 15 hours or so.
Simple Python Script to shutdown your Raspberry Pi.
Connect a button to GPIO-21 and press it and the Pi shuts down cleanly…
#!/usr/bin/python
#Simple script for shutting down the Raspberry Pi at the press of a button.
#by Inderpreet Singh

import RPi.GPIO as GPIO
import time
import os

# Use the Broadcom SOC Pin numbers
# Setup the pin with internal pullups enabled and pin in reading mode.

GPIO.setmode(GPIO.BCM)
GPIO.setup(21, GPIO.IN, pull_up_down=GPIO.PUD_UP)

# Our function on what to do when the button is pressed

def Shutdown(channel):
    print("Shutting Down")
    time.sleep(5)
    os.system("sudo shutdown -h now")

# Add our function to execute when the button pressed event happens

GPIO.add_event_detect(21, GPIO.FALLING, callback=Shutdown, bouncetime=2000)

# Now wait!
while 1:
    time.sleep(1)