Let us just keep a record of the map as it is at 06:30am NZTime. 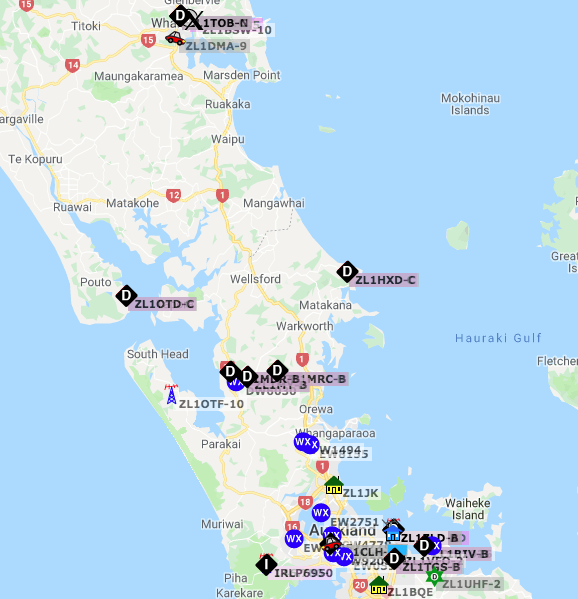
I will be driving from the little red car at the bottom of the screen grab, oddly to the red car ZL1DMA-9 in Whangarei – but between Wellsford and Marsden Point there is not a lot of digipeaters, so that is why I decided to do this little experiment.
From the rag chewing I heard on the local 2meter repeaters, there are quite a few people heading north today – so fingers crossed this little experiment will be successful – and I will consider any packet that is not mine captured via RF and iGated and Digipeaters between those areas as a success.
See you in 15 hours or so.
APRS in Wellington
Managed finally to locate the cigarette lighter in the rental car, it was very well hidden behind another panel that you slide over, so was able to briefly fire up the FT-7900 for a bit of APRS before I headed to the airport to fly out.
Lots of Object packet activity around Wellington but not a lot of ‘mobile’ traffic .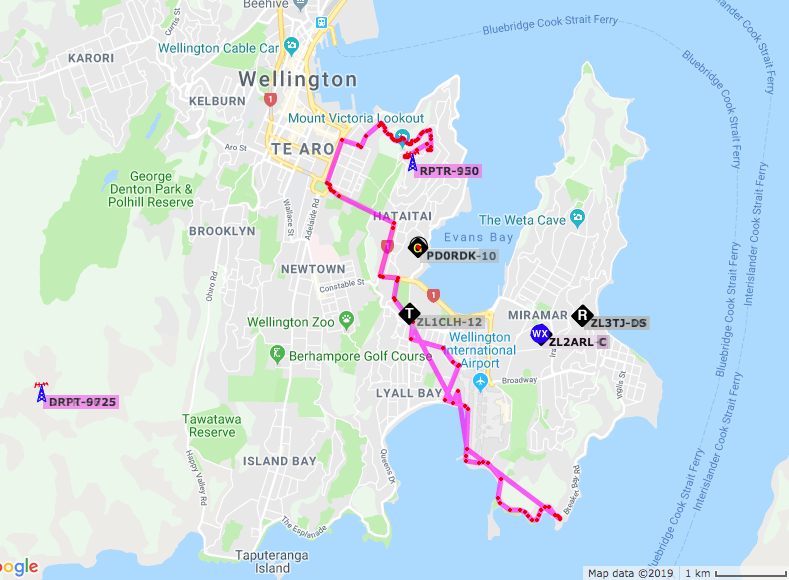
This is what I managed to get driving around Wellington – and that was selected for the last 8 hours on aprs.fi – so not much traffic, and I would have caught the morning commute in the time frame when I selected this screen shot.
I did however, see some traffic further up the coast, but they were iGating and not using RF at all – so much infrastructure down here in Wellington, as I was hearing my packets digipeated even in areas behind hills, but very little radio activity 🙁 – many ZL1’s thought it was because they were ZL1’s – but it appears even APRS traffic is kept hidden from people.
Anyway, had a wonderful time down here, and it won’t be too long before I come back down – so will get some awesome tracks on the next trip.
Simple Python Script to shutdown your Raspberry Pi.
Connect a button to GPIO-21 and press it and the Pi shuts down cleanly…
#!/usr/bin/python
#Simple script for shutting down the Raspberry Pi at the press of a button.
#by Inderpreet Singh

import RPi.GPIO as GPIO
import time
import os

# Use the Broadcom SOC Pin numbers
# Setup the pin with internal pullups enabled and pin in reading mode.

GPIO.setmode(GPIO.BCM)
GPIO.setup(21, GPIO.IN, pull_up_down=GPIO.PUD_UP)

# Our function on what to do when the button is pressed

def Shutdown(channel):
    print("Shutting Down")
    time.sleep(5)
    os.system("sudo shutdown -h now")

# Add our function to execute when the button pressed event happens

GPIO.add_event_detect(21, GPIO.FALLING, callback=Shutdown, bouncetime=2000)

# Now wait!
while 1:
time.sleep(1)My Byonics Tiny Track 4 settings
This are the settings that I have found work perfectly for my Tiny Track 4.
Just change to your callsign and you should be good to go 🙂
This has been an ‘export’ which should give you the ability to save this in a text file, and upload to the TinyTrack4 via their software.
 BANK 0
 P300 FALSE
 TXTDISP TRUE
 NODISP FALSE
 PPATHING FALSE
 DMSDISP TRUE
 MICETMV TRUE
 ENTS FALSE
 TELHIRES TRUE
 TELVOLT TRUE
 TELTEMP TRUE
 PREEMPT FALSE
 DIGIID TRUE
 WXPOS TRUE
 TELREAD TRUE
 FRAWDISP FALSE
 HRAWDISP FALSE
 WYPTXT FALSE
 PKTICOM FALSE
 PKTOCOM FALSE
 RPATHDISP FALSE
 LEDS TRUE
 PAVPEN FALSE
 DEC96 FALSE
 DDIST TRUE
 HEADERLN TRUE
 DMETRIC TRUE
 SOFTRST TRUE
 MSGCMD TRUE
 MSGCAP TRUE
 LRNTPS FALSE
 GPSCHK TRUE
 INTCLK FALSE
 DECSTAT TRUE
 DIGIMY FALSE
 TOSV TRUE
 TALT TRUE
 TSPEED TRUE
 TIMESTAMP TRUE
 TIMEHMS TRUE
 SBEN TRUE
 TSWPT TRUE
 AMODE GPS
 BMODE GPS
 ABAUD 4800
 BBAUD 4800
 BNKMODE 0
 SSIDROUTE 0
 ALTNET APTT4
 MYCALL ***YOUR CALL SIGN***
 PATH1 WIDE1-1
 PATH2 WIDE2-1
 PATH3 %
 TSTAT %
 BTEXT %
 BPERIOD 0
 TXD 40
 MTXD 10
 PERSIST 65
 SLOTTIME 15
 QUIET 10
 TRNKMODE 0
 CDMODE TONES
 CDLEVEL 20
 TXLEVEL 97
 TXTWIST 23
 RXAMP 37
 GWAYLEN 9
 GWAYMODE NMEA
 GRELAYBITS 1
 GRELAYRATE 0
 GKRELAY 0
 LOCATION 1234.5678N 12345.6789W
 GALT 1000
 TSYMCODE >
 TSYMTABLE /
 STATUSRATE 3
 PPERIOD 0
 MPPERIOD 0
 SBSSPEED 5
 SBFSPEED 48
 SBSPERIOD 90
 SBFPERIOD 45
 SBTANGLE 15
 SBTSLOPE 25
 SBTTIME 10
 MMSG 1
 TSOFFSET 17
 TDAO 0
 TPROTOCOL MIC-E
 TPSWITCH 0
 TPERIOD 0
 TVOLTTWK 128
 TTEMPTWK 90
 WPERIOD 0
 ALIAS1 %
 ALIAS2 WIDE2
 ALIAS3 %
 DUPETIME 30
 FILTERCALL %
 TXFREQ 144.390
 RXFREQ 144.390
 RXSQUELCH 0
 BANK 1
 P300 FALSE
 TXTDISP TRUE
 NODISP FALSE
 PPATHING FALSE
 DMSDISP TRUE
 MICETMV TRUE
 ENTS FALSE
 TELHIRES TRUE
 TELVOLT TRUE
 TELTEMP TRUE
 PREEMPT FALSE
 DIGIID TRUE
 WXPOS TRUE
 TELREAD TRUE
 FRAWDISP FALSE
 HRAWDISP FALSE
 WYPTXT FALSE
 PKTICOM FALSE
 PKTOCOM FALSE
 RPATHDISP FALSE
 LEDS TRUE
 PAVPEN FALSE
 DEC96 FALSE
 DDIST TRUE
 HEADERLN TRUE
 DMETRIC TRUE
 SOFTRST TRUE
 MSGCMD TRUE
 MSGCAP TRUE
 LRNTPS FALSE
 GPSCHK TRUE
 INTCLK FALSE
 DECSTAT TRUE
 DIGIMY FALSE
 TOSV TRUE
 TALT TRUE
 TSPEED TRUE
 TIMESTAMP TRUE
 TIMEHMS TRUE
 SBEN TRUE
 TSWPT TRUE
 AMODE GPS
 BMODE GPS
 ABAUD 4800
 BBAUD 4800
 BNKMODE 0
 SSIDROUTE 0
 ALTNET APTT4
 MYCALL ***YOUR CALL SIGN***
 PATH1 WIDE1-1
 PATH2 WIDE2-1
 PATH3 %
 TSTAT %
 BTEXT %
 BPERIOD 0
 TXD 40
 MTXD 10
 PERSIST 65
 SLOTTIME 15
 QUIET 10
 TRNKMODE 0
 CDMODE TONES
 CDLEVEL 20
 TXLEVEL 97
 TXTWIST 23
 RXAMP 37
 GWAYLEN 9
 GWAYMODE NMEA
 GRELAYBITS 1
 GRELAYRATE 0
 GKRELAY 0
 LOCATION 1234.5678N 12345.6789W
 GALT 1000
 TSYMCODE >
 TSYMTABLE /
 STATUSRATE 3
 PPERIOD 0
 MPPERIOD 0
 SBSSPEED 5
 SBFSPEED 48
 SBSPERIOD 90
 SBFPERIOD 45
 SBTANGLE 15
 SBTSLOPE 25
 SBTTIME 10
 MMSG 1
 TSOFFSET 17
 TDAO 0
 TPROTOCOL MIC-E
 TPSWITCH 0
 TPERIOD 0
 TVOLTTWK 128
 TTEMPTWK 90
 WPERIOD 0
 ALIAS1 %
 ALIAS2 WIDE2
 ALIAS3 %
 DUPETIME 30
 FILTERCALL %
 TXFREQ 144.390
 RXFREQ 144.390
 RXSQUELCH 0
If you see anything that looks wrong, or can recommend a change, please let me know, but in Auckland, these seem to be a really good settings.
We have setup audio levels and twist on an HP 8921A and this was set for an Yaesu FT-7900.
Portable APRS iGate, Digipeater and GPS tracker build
So this weekend, 27th July 2019, the Whangarei radio sale is on, and looking at the arps.fi map there is a rather large area north of Auckland that has no APRS coverage.. 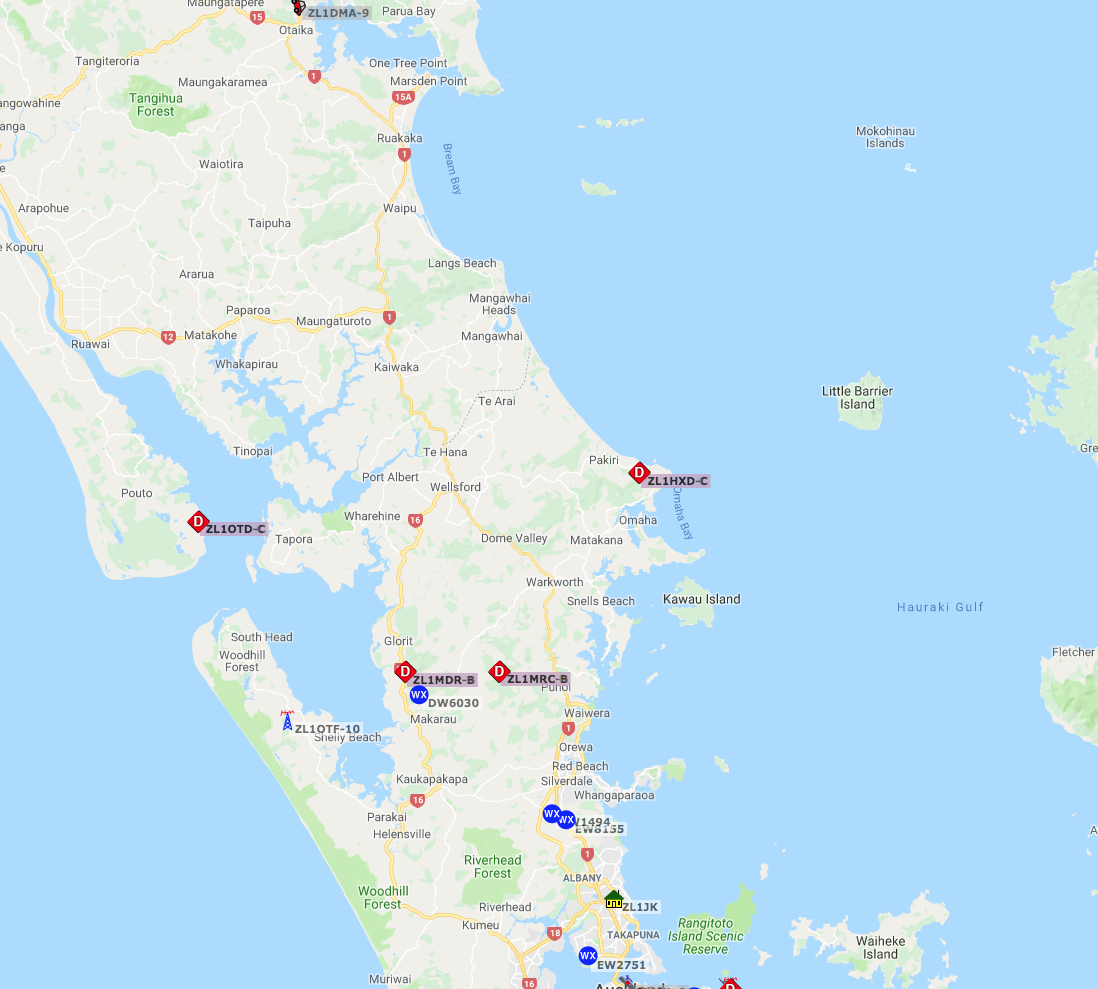
With a bunch of Hams travelling to this sale from the Auckland region, I decided I would build a portable APRS iGate and tracker out of a Raspberry Pi, GPS and a CM108 audio sound card – which I have had working for various other projects – that have not been blogged here just yet but will shortly.
I am going to document the process I have gone through to build this unit, which will be built from fresh on a Raspberry Pi.
My Instructions for installing:
Please note: I will let you do your own security / password / username changes – this is just what I have done excluding those settings.
Load the latest version of Raspbian onto your sd card.
I prefer to use dd for this – in my case
dd if=./2019-06-20-raspbian-buster-lite.img of=/dev/rdisk1 bs=1mI like to make my Raspberry Pi’s headless so after writing the Raspbian OS to the card, you should have a boot folder visible from the SD Card – there create a plain text file called ssh to enable the SSH server on first boot and a file called wpa_supplicant.conf that contains the following details to enable your WiFi to connect on first boot up.
ctrl_interface=DIR=/var/run/wpa_supplicant GROUP=netdev
update_config=1
country=*TWO-LETTER COUNTRY-CODE-IN-UPPER-CASE*
network={
   ssid="YOUR-WIFI-NAME-HERE"
   psk="YOUR-WIFI-PASSWORD-HERE"
}
This will enable ssh on boot, and it should connect to your nominated WiFi access point on first power up – in my case, I will be connecting it to my Cellphone’s hotspot, so I can push the packets I receive to an iGate.
Once its booted up, ssh to in and Update to get the latest available packages list for raspbian, then the upgrade command to upgrade to the latest packages, then install the following new packages…
sudo su -
apt-get update
apt-get upgrade
apt-get install vim gpsd gpsd-clients git build-essential libasound2-dev libudev-dev alsa-utils rsyslog logrotate libgps-dev
Explanation as to why I am installing each of these packages :
vim – because I like vim
gpsd – because I am going to be running this as a tracker, and have a USB gps module
gpsd-clients – to see if the GPS is working.
git – to download from git because the raspbian version of direwolf is pretty old.
build-essential – will enable you to build packages
libasound2-dev – used for the cm108 sound card to allow direwolf to use the ptt GPI/O
libudev-dev – needed for developing applications that use libudev.
alsa-utils – needed for alsamixer and the like.
rsyslog – to log stuff 😉
logrotate – so your logged stuff does not fill the SD card too much
libgps-dev- gpsd development packages you can build direwolf against.
Once you have done all that,
git clone https://www.github.com/wb2osz/direwolf
cd direwolf
make
make install
Then quickly run direwolf you should get the following error:
Dire Wolf version 1.5
Includes optional support for:  gpsd cm108-ptt
Reading config file direwolf.conf
Audio device for both receive and transmit: default  (channel 0)
Could not open audio device default for input
No such file or directoryPointless to continue without audio device.
What I am looking for is gpsd and cm108-ptt support, which I can see is there.. thats a good thing.
Now to get on to configure direwolf.
Configuring Direwolf
These are my current (23/July/2019) settings, I am going to go for a drive tomorrow to work and see how they perform.
Basically I am beaconing to both an iGate and to RF – this is for both my GPS coordinates and for my Info beacons.
 ADEVICE  plughw:1,0
 ACHANNELS 1
 GPSNMEA /dev/ttyUSB0
 LOGDIR  /var/log/direwolf/
 CHANNEL 0
 MYCALL **CHANGE TO YOUR CALL SIGN**
 MODEM 1200
 PTT CM108 /dev/hidraw0
 TBEACON sendto="IG" symbol="igate" overlay=T VIA=WIDE1-1,WIDE2-1
 TBEACON sendto="0"  symbol="igate" overlay=T VIA=WIDE1-1,WIDE2-1
 SMARTBEACONING
 CBEACON sendto="IG" info="> Testing Portable iGate and Digipeater via iGate"
 CBEACON info="> Testing Portable iGate and Digipeater via RF"
 DIGIPEAT 0 0 ^WIDE[3-7]-[1-7]$|^TEST$ ^WIDE[12]-[12]$ TRACE
 IGSERVER **USE APPROPRIATE IGATE SERVER**
 IGLOGIN **YOURCALLSIGN** **YOURPASSWORD**
 IGTXVIA 0 WIDE1-1
 FILTER IG 0 t/m
 IGTXLIMIT 6 10
These settings seem to work correctly, I am sending the CBEACON out via iGate and RF based on those settings, and I am seeing a Digipeated packet when I receive a packet.
My GPS Coordinates are transmitted via RF and directly via TCP/IP to the iGate – which I know is not ideal, but there is going to be a large part of this drive that will not have any RF coverage, so I am looking forward to getting the trip logged and I am not able to digipeat my own packets and I would also like to see how useful this is to Digipeat the fellow Hams driving to the sale – if there are any.
The only settings I think I will try and take from my TinyTrack 4 is my SmartBeacon settings, which I think I will need to confirm from Knotts to MPH as that is what Direwolf seems to use.
As always, if you see any problems, or comments and suggestions would love to hear from you.
Hawaii Grid Madness 2018
So I decided I needed to get away from New Zealand and ended up in Hawaii.
I started to chat with an awesome guy called Todd – but I will let their page tell you all about it..
https://hamradiohawaii.wordpress.com/2018/10/17/simplex-exercise-grid-madness-2018/
5 December 2013 – New Zealand Amateurs get 6meters (50mhz) returned to them.
In the early hours of December 5th 2013, with Analogue television switched off, the Amateurs in New Zealand had the 6 meter (50Mhz) band exclusively returned to them after 53 years.
Sure there were licenses allocated to amateurs to use the band during this time, but they were limited to where they could use it, how much power they could transmit with, and how far away from some TV transmission towers they could be.
I had worked in TV for 13 years at this stage, starting back in late 1999.
And never did I believe, I would have been one of the first (if not the first) to use the 50mhz band after analogue switch off, and exclusive access returned, but here you go – me, calling the first CQ on the national calling frequency 50.110Mhz in just over 53 years.
https://www.youtube.com/watch?v=OLtwsvXbR1E
– honoured, privileged, and a little chuffed is all I can say –
My friend Jeremy would have been proud of me, but he passed away 6 weeks before, never seeing a day where the QRM annoyance of Waiatarua (Auckland’s TV Transmission tower) would no longer affect his radio listening pleasure.
Since getting my Ham license, I have always been interested in 6 meters – mainly because it was the TV transmission band, but I will always have a love for this band, and discovering this video on Youtube, has made me fall in love with it all over again.
Purchase of Tiny Tracker 4 with Screen.
I started off playing with Direwolf before I decided to purchase the Tiny Tracker 4 – mainly because looking at the Raspberry Pi, Sound Card, PTT componentry, Radio and associated cables, make it look like I was transporting some form of home made explosive device of some description – and I figured as I was travelling in the US for a month, and taking it through the US Airport system was going to be a very very bad idea… I brought the Tiny Tracker 4.
I decided I would order it with the Screen, after all an LCD display could display all the cool GPS information and lots of other things right… well no.. the TT4 and its Screen does not seem to work like that.
You can’t get ANY GPS data on it whatsoever, no number of satellites, no real time clock, no live position of you.
What it does display – to be honest not a lot – it seems fairly pointless information – it appears to only display the last packet the unit heard over the air, not digipeated, and living in ZL land, I can drive for about an hour and not hear directly any other APRS stations at all – and while there are a few digipeaters that transmit, the majority of them receive only – including mine for the moment – so on my morning commute, I think I get one maybe two stations on the display in the 35+ minutes I drive to work.
I see the carrier detect amber LED flash on a regular basis, and when you select ‘display’ raw packets, I can see them alright, but they don’t decompress the data, so you see the standard compressed packets : 052410h/a-D%z\h0>/!_
Not that useful.
Alright you say, the TT4 has messaging – yep, but in the two years of owning it, I have never received a packet message on this unit, and this is not for a lack of trying, believe you me, go through the messages on APRS and you will see lots of ‘test messages’ attempting to be sent to ZL1CLH – but they never make it through to the TT4 – I am convinced that all the iGates in ZL do not transmit messaging, although I am advised they do – ZL1VFO has been very helpful on testing what is going on and why messages do not get delivered – but it seems that, for the moment, even messaging for this unit is unsuccessful.
I am not saying this unit is bad in any way, but I had high hopes for it when I purchased it, cool information about the GPS satellites and a super accurate clock on the screen while I drove around, messages via Radio and not GSM – but none of this seems possible from the unit and its screen.
It works fantastic as a tracker, once configured correctly – but for all the other interesting things a ham might want – it is fairly unimpressive.
Tiny Tracker 4
So, it has been over two years since I purchased an APRS Tiny Tracker 4 when I was in the USA for Dayton Hamvention 2017.
I am finally starting to do something with it, after using it in the states fairly unsuccessfully for my drives around Dayton and Orlando, and when I say unsuccessfully – I really had no real idea what i was doing with it and since I have been back in ZL land it really has been put away forgotten about – being unused.
However since starting a new job in 2019, I have been working with a very interesting Ham who also runs a lot of APRS, I have pulled it out, and starting to configure it.
Searching for settings and finding not much useful information online around configuration of this unit, or anything really around APRS in general – or more accurately – a lot of dis-information I have found, is actually what lead me to start this blog for my radio activities.
Here is a 24 hour period of tracking from https://aprs.fi as you can see I have Smart Beaconing working quite well thanks to ZL1VFO and a lot of time asking questions – I am fairly happy with the way it is tracking now for me.
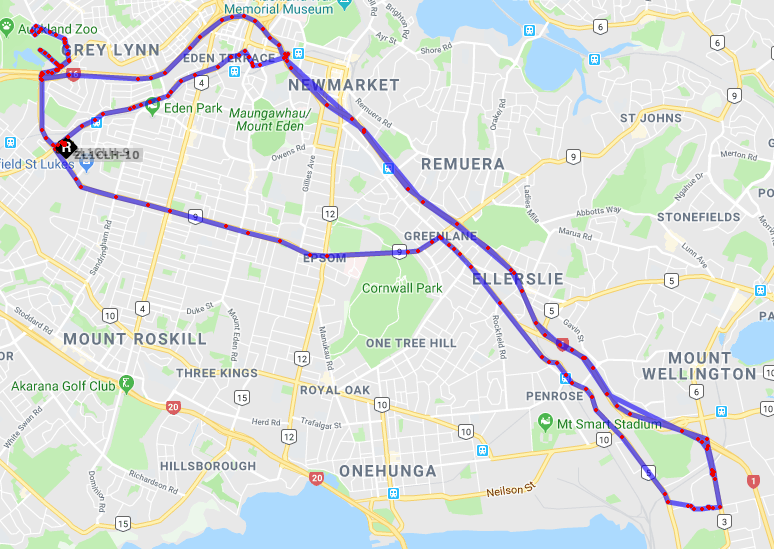
Once I get really happy with it, in the next few days, I will upload my config file here – in the hope that when someone else buys one – they don’t need to go through all the frustrations I have been through trying to work out settings and other things for this unit.